First .get a smooth emu egg . The rough outer surface will not allow you to do a portrait. These eggs are 1 in 50 so they are very hard to find, you will need to visit your local emu raiser . Sand dark area where photo is to be attached with 320grt followed by 600grt. then apply picture (printed in indelible ink) to egg with EZ-transfer. I tried flour and water, it doesn't work well.
Use dental tool with inverted cone (smallest one) cut through print to egg scoring a line around all light areas , being very careful around the eyes.
take dental tool after removing print go around subject to make sure of boundry
remove background dark layer . I use the dremmel and 1/8 inch rad cutter . You want to stay in the dark and crumble layer only if you can while doing this part.
At this point I have filed, water sanded and polished background . This process darkens background and removes tool marks.
first very carefully cut around eyes, take your time here as this can make or break your project
use small inverted cone , dental.
In this lesson use smallest diamond foot ball , dental and bring out facial highlights, just breaking into crumble layer that is just underneath the dark layer.
now it gets hard , you now have to shade the darker areas of the face and this requires you to partialy remove dark layer. I do this with files , knives and sandpaper, also start blending areas to smooth things up
with inverted cone dental tool I do all white areas , the white layer is VERY thin , this is the most dificult part for me. The male subjects collar was shaved with a knife after carving to smooth it out.
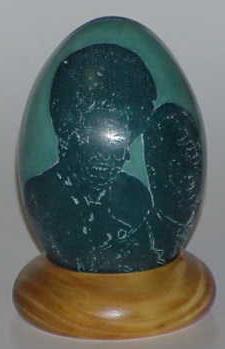
THE FINISH
at this point I am tuning up the faces getting everything right and starting tinting the clothes using sandpaper and files and knife